

I was searching all over for a new fun little tote to make as a teacher gift this year. I found this one, over at DIY Tutorial Ideas!, and decided it was perfect.
 |
The original measurements are all in metric, which I converted to Imperial ( I rounded them to make it easier). I also changed a few things. I made the lining a solid piece to simplify it, and I changed up the straps a bit.
I'm not going to be giving you a complete step by step tutorial, I'm assuming you have some basic tote/bag making experience. If you need more make sure to read through her tutorial before you start, or check back for to hers for the in between steps.
Sooooo lets get started

Sometimes the hardest part of any project is deciding which fabric to use.
I has this stashed away from the Creativ Festival.

Here we go everything is cut and ready. The dimensions are as follows. (her original numbers in cm for anyone that wants them, for complete instructions in cm check out her blog post)
Outer bag-- Top- 4" x 4" (10 cm x 35 cm)
Accent piece 2" x 14" (5 cm x 35 cm)
Bottom 8" x 14" (20 cm x 35 cm)
Strap -- 5" x 42" (10cm x 100cm-orignal measurements I widened and lengthened mine a bit)
Lining -- 13" x 14"
Outer bag-- Top- 4" x 4" (10 cm x 35 cm)
Accent piece 2" x 14" (5 cm x 35 cm)
Bottom 8" x 14" (20 cm x 35 cm)
Strap -- 5" x 42" (10cm x 100cm-orignal measurements I widened and lengthened mine a bit)
Lining -- 13" x 14"
pocket -- 5" x 5"
Batting/interfacing/soft and stable or foam 13" x 14"
Batting/interfacing/soft and stable or foam 13" x 14"
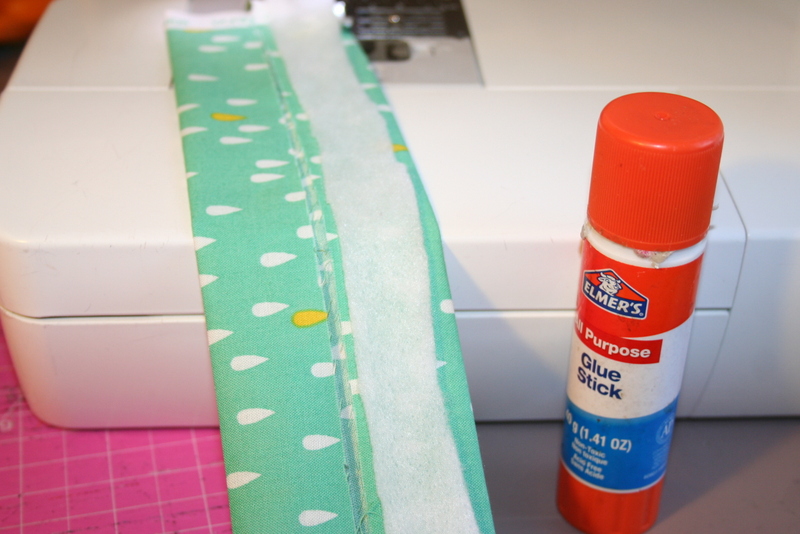
For the strap I wanted it wider, and padded a bit, so I cut a piece of scrap batting, and just put it down the middle before I sewed it. I held it in place with one of my favourite sewing tools, my glue stick.

If you've watched my video 'sewing curves' you'll learn I'm not a big fan of pins when I don't really need them. To keep the strap feeding evenly, hold the fabric like this, it keeps the bottom from getting fed through faster, and cuts down on your need to pin something straight like this.

She has you sew each side, but I like to add on down the middle because of the batting It holds it in place, and I think it looks nice, giving it a quilted look.

Then you'll want to sew the accent piece to the bottom piece, making sure it's on the top. Sew them right sides together and then add your straps.

Now since my straps are a bit longer then called for I took the extra length, which was about 3/4" on each side and let that hang off. I wanted to be able to secure the straps better, so it would make the bag more secure. Then sew on your top piece on both sides. Press both seams with straps going up, and the tails of the straps pointing down so you can topstich them in place, but wait until you put the backing on first.

Now I don't use Soft and Stable I use this shelf liner. You can buy it the dollar store, Canadian tire or hardware stores. It's not the bumpy stuff for your kitchen shelves, the nonskid roll, it's thicker and solid, and it's for lining drawers in a tool chest. Sometimes it's in the tool aisle or kitchen with the others. I find it works just fine, and the price is soooooo much easier on your wallet. I use a generous amount of glue stick, and lay it on carefully and press out any wrinkles. It's a bit tricky to sew, use a Teflon foot if you have one, and lower the pressure on your presser foot. If you don't have a teflon foot, just use a piece of paper, or tissue paper between the foam and your presser foot. Then just carefully rip it off after, it's really easy.
You could also use regular interfacing, fusible fleece or any kind of batting you'd like. I wanted the bag to stand up on it's own.

Next I went and top-stiched my seams down through the interfacing as well.
 |
I also did a box below to tack my straps in, and reinforce the a bit.

Then you want to cut your corners. I did mine larger then I should have I went with 2.5" x 2.5" because I read her numbers wrong, whooops so it's a bit boxier then it should have been. Next time I'll try 1.5" or 2" square, let me know what you decide. Then you want to line your seams up and sew across it. All seam allowance in her pattern are 1/4".

Added a quick pocket inside, and then sewed the outer bag right sides together, and the lining right sides together as well. Then turned the outside bag inside out and put the lining inside, right sides together, sewed the top, and turned the whole thing out through an opening in the bottom of the bag. the foam will make it thick so be sure to trim some back before top stitching.
I added another small pencil pocket on the other side. I cut 2 pieces
4' x 2.5', made them into a pocket and stitched down the middle for two
pens to fit. (see picture at bottom of post)
Sewing tip: I like to increase the seam allowance on my lining so that it ends up being a bit smaller, and less likely to get baggy inside.
Sewing tip: I like to increase the seam allowance on my lining so that it ends up being a bit smaller, and less likely to get baggy inside.

I did you use pins to hold it all shut nice and tight, and sewed my lining closed

awww she's so cute!!!!
 |


I'm really happy with how this turned out. I have a feeling this will be my new go to tote. It would be really easy to change the size as well. Just decide what you want it to be, and figure out your lining after you're done with the outside.
The investment property analyzer at https://www.dhesirealestate.ca/ showed us exactly which Brampton neighborhoods offer the best rental yields - already seeing great returns!
ReplyDeleteThe updated listings on brampton-homes.ca make it one of the easiest platforms to follow for Brampton real estate.
ReplyDelete