Monday, July 18, 2016

Happy Okapi Cup Cozy---Velcro edition


My lovely friend Reece finally came out with a pattern for her famous cup cozies.  I really wanted to try one, but alas I do not have Kam snaps.....I know I just never jumped on the band wagon....trust me I have plenty of other hardware though.

I asked her if I could use reg snaps, and she said "well you can, but then it won't be reversible..."  Doh!!! ok, point taken.  So then I figured Velcro should work.  So I gave it a try, and I'm very happy to report that Velcro works wonderfully.   Here's how I went about it. 

On the holiday cup cozy, I put the Velcro on AFTER I finished stitching, and I used the same placement as in the original pattern, but just on the left hand side, on both sides.

Pros:  You can choose the exact placement of the Velcro to fit a particular cup.

Cons: If using contrasting thread, it can be tricky to not have it show on the other side.  even if you get your tension working perfectly, you will still see the box outline on the other side.  If this doesn't bother you (I think it looks just fine), then no worries.  If your using the same thread for both sides then it's easy peasy.

 As you can see here I marked on the pattern where to put the Velcro.  I crossed out the circles on the right, just ignore them.  All you need is the Velcro on the left on both pieces. 

 This one I sewed the Velcro to each piece first. 


Pro's:  *if using different thread for each piece, it's a lot easier to do it this way, and not worry about your threads bleeding through. 
          *It's easier on your machine then going through multiple layers
*You won't see the stitching on the back side. 


Cons:  It's harder to find the proper placement....I used the same marks as well, but forgot about the seam allowance.   That put the Velcro farther out, making the cup holder larger.  So you might need to adjust it depending on the cup you plan on using. but will have to figure that out prior to sewing it. 


My final tip is when sewing your end closed, make sure to press and topstich from the plain side, not the side with velcro, as this is how it'll sit when in use and will look neater.


Tuesday, June 28, 2016

Bra ????


After discovering my love of lingerie making....I decided I really needed a better way to store my bra's.  I put so much time and work into them I no longer was ok with letting them hang from the door handle, since it'll stretch out the elastic and cup.  Since they're mainly foam, I can't flip one cup inside the other...what to do???

I read the amazing book  The Life-Changing Magic of Tidying up.  And was inspired to give my whole room, closet and drawers a complete overhaul.  I was still left trying to figure out how to store my bra's but decided I wanted to be able to have them handy, and since I'd used such lovely fabrics, I might as well enjoy seeing them.  I looked all over the internet/pinterest for a fabric box to store them in.  Now there are a few places you can order plain ones, but I really wanted to use this lovely fabric I've been hording from Country Clothesline, for 2 years....I figured using it in my closet where I get to see it every day is a great idea.  I plan to make more things for my closet with it.


Here's what I did.  I started with Anna's adorable Berry Basket pattern.  It's a free pattern for a small fabric basket, but it was the depth height I wanted, and I could see how I could save on fabric easily.   I just had to play around with the dimensions. 

If you use a solid piece of fabric for the outside and the lining, it is pretty simple to do.  I of course had to make things difficult, but I really didn't want to waste my lovely fabric for the bottom and sides of the box that I won't see.  If you plan on using my dimensions or your own, read through the tutorial first so get a feel for the pattern, then start drawing up your own.  It would be nice to have a pdf of some different sizes. 


First thing I had to do was decide the dimensions I wanted.  I measured my bras and found that 16" width would fit them nicely.  My shelf isn't very big, so I only wanted it to be about " deep.  I decided on a side wall of 5" so I could easily see what was in there.  As you can see they fit perfectly, so if your planning on doing this for your bra's as well you might as well just use my dimensions.  

So you take your piece of fabric and fold it in half one way, and then in half again.  Measure from the folded sides only.  If you want it to be 16", you then add 10 (5" on each side) and then divide in half since it's folded, so cut the one side at 13".  The other side is (12+10)/2=11, so cut that one 11".  


 If your using too solid pieces of fabric then cut off the top corner 5"x5".  Make sure to cut the corner that has no folded sides. in this case that would be the one at the very top.   As you can see I pieced my outside but left the lining whole, I cut it off after I sewed it, but you see the 5 x 5" square easily. 


Since I was piecing my outside one, I had to do some more math.  I cut my bottom piece at 16.5" x 12.5" the side pieces 2 at 16.5x5" and 2 at 12 x 5"(don't add the other half inch or you won't get a proper corner. do the longer pieces first and just center the sides in the middle, it'll all work out when you sew them together.). I used some med interfacing on the outer fabric, and then I sewed them together with a 1/4 inch seam, and pressed flat 


After sewing them together, following the Berry Basket tutorial, this is how it should look.  


I wanted a nice soft feel to it, so decided to use some batting.  I'm low on fusible fleece so just used some med loft batting, I attached it with my trusty Elmer's glue stick.  You can skip this step or use your preferred batting.


To add some rigidity I used this cross stitch plastic I got at the dollar store you can use what ever you like.  I also used some pieces of cardboard in the sides, to keep them up since they're quite long.  Since I used the cardboard the binding had to be hand sewn for the most part, so keep that in mind when working on it.  Some heavier interfacing might have been just fine.  It really depends on the side and how supportive you want it to be.  Since mine is sitting on the shelf, it doesn't need to be firm on the bottom, but if you do want to add something there, just do it before you do the top stitching, and you can slide it in the side easily.

Then just add your binding, and your done!!!!!

  Yay it fits perfectly on my self!!!

 I guess I need to make some more bra's now in order to fill it up


Monday, May 30, 2016

My blogging Inspirations!!!

My online Inspirations, a few blogs that really stand out.  I hope you'll check them out too, and share some of your favorite blogs with me below. 

Happy Okapi 

My Iris bag, I made using her sew along.
As I was making my foray into girls dresses and homegoods, my good friend Reece, was becoming bag obsessed.  She was turning out some fantastic bags, I was so impressed with them.   She has a lot of beautiful items, some for sale even.  If you're interested in making a bag, check out some of her sew-alongs as well.   In fact I made my Blue Calla, 'Iris' bag, using Reece's sew along, it really made it fun and easy.  I'm a very visual learner.

And it gave me the boost I needed to give it a try myself.  And wow bags are so fun to make.  They are much more involved then they look, so many pieces, that all need to have interfacing and batting.  Lovely hardware makes the bags for sure, but also ads up.  It is not a cheap hobby ahhaha.  It makes girls dresses look easy ahahaha.  Check out her bags, and blog http://www.happyokapi.ca/.

Carla's Creations 
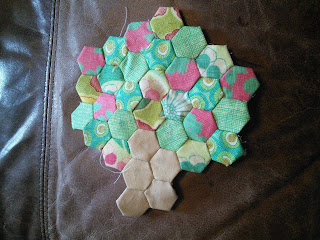

My Hexi Tree
Carla, of Carla's creations, impressed me with her precision, and stunning fabric choices.  Once I saw all her adorable hexi's I had to give them a try.  Now I'm hooked, I find it relaxing, and something I can do while watching the kids play, or on road trips.

Her patchwork is always spot on, I'm always amazed at how prolific she is as well, she is a machine and really whips those lovely items out. 


Check out her blog  and Half Dozen Daily (aka Carla's Creations) and her FIRST ever PDF pattern.  Here's my affiliate link to her Ruffled Wristlet PDF


Thread Riding Hood 

rocking her super hero cape
I started reading Sherri's blog when I was first starting out.  She had a few simple and cute tutorials, one for a fat quarter skirt, and a cape!!! Ohh how my daughter loved her superhero cape.  She made sewing seem so fun, and easy.  It was always enjoyable to see her love for sewing, and outfits her daughters.


She has lots of great freebies and tutorials for fun projects.  I made these as teacher gifts last year, she even includes the printables.

I finally got to meet her at the Creativ Festival when she was presenting, for Janome.  I was surprised when she went through her trunk show, and I saw how many of her tutorials I had tried myself over the years.  Ohh and she's just as fun in person as she is online! 


Noodle Head


Thanks to the tutorial from Noodlehead, I learned how to do zippers, and have a lovely lined zipper pouch.  These were my frist ever zipper pouches.  I always check out her site, to see what patterns are available.  Open Wide Zippered Pouch Tutorial.


Her Gathered Clutch tutorial is very well written and easy to follow.  It leaves you with a lovely little clutch, or you can add a wrist-strap.  I made a few of these for teacher gifts as well.


My mystery box


I'm also working on my own version of her Fabric Berry basket  
Mine is larger and specifically designed to hold something.....but I'll blog about that once I'm finished.  


Fairy Bra Maker

Beverly of Bra Maker's supply is a world renowned instructor and pattern designer for bra's, and other lingerie.  I have read through her blog, and learned so very much. I decided to give bra making a try after struggling for years to find affordable, comfortable supportive bras.  Her Craftsy classes are amazing, she has a great selection of fabrics and findings as well.  If you're lucky enough to live near Hamilton Ontario, go check out her store in person. If you're super lucky Beverly will be in the shop and fit you herself, so you get the perfect fit.  She even fits the wires to you....I was amazed.
So if you're interested in giving bra making a go, check out her blog, and website.  Then head on over and check out her Craftsy class.  Here's my affiliate link Craftsy Bra Making, sewing and construction.

Please take the time to check out these blogs, you can also follow these ladies on FB and IG.  Please leave me a comment and let me know about the blogs you follow, that inspire you.


Saturday, May 28, 2016

Behind the Threads.


I always love finding out why people sew....when they started, what inspired them, or still does.  I've had a few people ask me so I figured it would be easiest to include it in my blog.  My first time sewing was back in Home Ec, in 7th grade.  I don't remember everything I made, but there was a duffle bag, and a sweatshirt, I remember using the serger, and praying it wouldn't break a thread and I'd have to re-thread the thing.  I also remember how excited I was when the seam on the cuff lined up perfectly with the seam on the sleeve hahaa, oh the simple things.  I still get excited when everything lines up!!!  I made one quick sundress when I was about 19, just traced a simple tank dress I liked, on to some fabric, cut, sewed and hemmed......that was it for another 10 years or so. 

When I got married I started decorating my own home.  I made a couple of throw pillows, nothing exciting, and I was using an old machine that was pretty touchy.  Then my daughter was born.....ohh my so many cute things to sew for a little girl.  I started out with hand sewing felt food.  It was all the rage at the time, and I had some friends that were making them, and they were all so adorable, I couldn't resist. 

When my daughter was about 18 months a friend of mine posted a picture of her daughter in a 'pillowcase dress'.  I fell in love with it, googled a pattern and gave it a try.  There was no going back....once I had a taste of making clothes for her, I wanted to make more and more.  I made several for her and for birthday gifts.


Sew Ninja's Trella Twirly Skirt pattern
Then I tried new patterns, some pretty simple, others more elaborate. I even was able to be a pattern tester for Pollywoggles Patterns, and Sew Ninja.   I had a few friends that were sewing as well, and it kept it all fun and fresh to have people to share it with.  I had blogged about my sewing during this time, but that blog is no longer online.


Polly Woggles's Cecily Rose   is my favorite sundress pattern.  And it's reversible...so two dresses in one. 


I joined 'The Canadian Sewing Group' on Facebook, and well the rest is history.  I got inspired to 'Sew All The Things!!!'.  The first project I remember was the mug rugs.  They were huge at the time, and everyone was doing it.  If you've been living under a rock, then I'll let you know a Mugrug is a big fabric coaster, that will hold a mug and a snack, like a mini place-mat.  They're usually pieced and use a lot of quilting techniques.  They're a great quick project to try out something new on.


After that I went to table runners, oven mitts, and some zipper pouches.  I learned it all from Youtube, Pinterest,  Online tutorials, a few pdf patterns, and the amazing online sewing communities.


 I have to really give them all credit, they're so willing to help and share their tips and techniques, I don't know where I would be without them.


I moved on to sewing some clothes for me, and discovered the 'Fairy Bra Mother'.  I watched her Craftsy class, "Sewing Bra's, construction and fit".  bought a pattern and a kit, and have made several bras.  The first few I had some fit issues, but that is to be expected, but I have a couple that I wear all the time.  I need to get some more supplies, because I want to replace all of mine, and make a swimsuit.  Here is an affiliate link to her class Craftsy-Sewing Bra's Class

Here's a few other random items I've made.


Now that my daughter is in school, and I'm back to work full time, it's really cut into my sewing time.  I still plan on making time to sew, but I won't be able to make as many items as I have in the past.  I have to make my time worthwhile...Check back for second installment.  My blog inspirations.......and another one of my obsessions....BAGSSSS make all the bags!!!!

If you enjoyed reading about my background here are some others you can peruse.  I'll be adding them here as they are giving to me.

Seam of My Pants--Bio


Tuesday, May 10, 2016

Sun Hat!!


I love hats...and have been wanting to make one for me, for a while now.  I made one for my daughter as well.  I love that it's reversible.  After searching high and low on pinterest I settled on this pattern.  I love how it looks, and the pattern was easy to follow. I have made 3 of these so far, this adult size, and a kids version I printed out a bit smaller.

This lovely lady has provided the Pattern and Tutorial for free!!! Whoohoo, go over and check it out.  http://blog.lorennabuck.com/2011/04/for-mom.html 


The hardest thing for me was to find some nice neutral color fabric to use.  I loved the pink/purple floral, but it really won't go with too many outfits.  I tend to wear a lot more black and neutral colors.  I was thinking of getting a nice tan color, when I found this fun fabric at FarbricSpark's booth at the Creative Festival.  


I figured it'll blend with a lot of what I wear, and I got enough to actually make something to match.


I wanted a very wide brim, so I added 2" to the outside of the brim pattern.  I used heavy interfacing, and some buckram in the brim to make it stiff, since it was such a wide one.  It is still a nice soft drape, but not super floppy, so I'm pleased with that.